
Problem
Whining noise from the rear of the car, which could be misdiagnosed as a wheel bearing.
Cause
The rear differential taper roller bearings have become pitted and worn. This could be due to the rear
differential oil not being replaced at the set service intervals or the incorrect oil has been used.
Solution
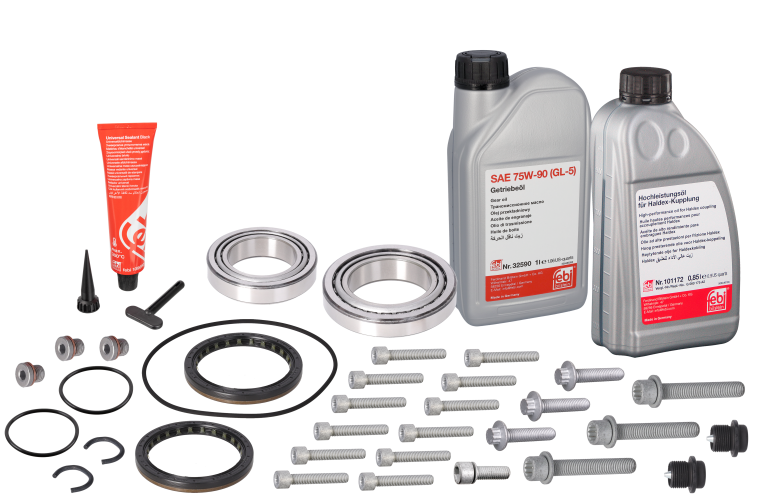
febi have developed a Repair Kit for this differential unit which includes the bearings, seals, fixings
and oils, which is not available from the vehicle manufacturer. This offers a more economical repair
solution than replacing the complete differential unit.
To fit:
Various Volkswagen, Audi, SEAT, Škoda and Cupra models equipped with four-wheel drive and a 5th generation Haldex coupling.
The rear differential unit needs to be removed from the vehicle to carry out the repair, which will
vary from model to model.
First drain the differential and Haldex oils, and then remove the rear exhaust section, anti roll bar,
propshaft and driveshafts.
To access the three retaining bolts, one can be reached from underneath the vehicle, while the
other two can only be accessed by drilling holes in the floor of the luggage compartment at the
designated points (Fig. 1) provided by the vehicle manufacturer for this purpose.

Alternatively, the complete rear axle assembly and subframe can be removed from the vehicle
to remove the differential unit.
Note:
Correct maintenance is essential to achieve the maximum life of a drive unit. The most important
element of maintenance is correct lubrication, since incorrect or lack of lubrication can cause
serious damage to the drive axle parts.
With the differential on the bench, remove the left and right driveshaft flanges using a slide hammer,
then remove the circlips.
Remove all housing bolts and split the two halves of the housing, then remove the differential and
crown wheel assembly. Inspect the taper roller bearings for pitting and damage. (Fig.2)

Remove the Haldex clutch unit from the differential housing and inspect. Then check the smoothness
of operation of the pinion bearing by turning the shaft by hand. (Fig.3)

With the differential unit stripped down, remove the two magnets from the fluid chambers and
clean any debris from the housing and differential. (Fig.4)

Once cleaned, remove the driveshaft seals from the housing. Then, using a suitable brass drift
and hammer, tap out the bearing inner cups and shims on both sides.
Press off both taper roller bearings with a hydraulic press. Clean all mating surfaces and press
in the new bearings, followed by the new bearing cups into the housing, remembering to install
the shims first. (Fig.5)

Rebuild
Correct reassembly and the replacement of all damaged and worn parts are important to achieve
correct operation from an axle overhaul – cleaning and close inspection are also vital.
Test fit the differential with the new bearings and ensure the differential runs smoothly with the
required backlash and there is even contact with the crown wheel and pinion teeth.
Apply a gear marking compound that contains lubricating grease and coloured pigments (such
as Engineers Blue) to the mating gears. Install the differential to the housing and bolt together
the two halves, then insert the driveshaft flanges into the differential.
Turn the pinion in both directions checking for smoothness of operation. Once satisfied, remove the differential and check the pattern on the mating surfaces of the gears.
The optimal contact pattern should be centred on both the full depth tooth and the face width. Clean the marking compound from the gears and apply the liquid sealant provided to the mating surfaces of the housing. Install the two magnets into the oil chambers and reassemble the differential housing. Then, using a suitable drift, install the new driveshaft seals.
Fit the new circlips to the driveshafts and install them into the differential. (Fig.6)

Before refitting the Haldex clutch unit, remove the pump and clean the plastic gauze filter. Apply the new ‘O’ ring seals to the Haldex unit and pump and refit to the differential housing.
Reinstall the repaired differential unit to the vehicle and fill the differential and Haldex unit with fresh oil from the kit, ensuring the correct oil is applied to the correct area. (Fig.7)

Road test the vehicle to test the four-wheel drive operation and quietness of the repaired differential.